Changing True North in Revit: Guide to Aligning Model with Geographic Orientation
Introduction
Revit, the powerful building design software, offers designers and architects the ability to accurately model and visualize their projects. When working in Revit, understanding the concepts of True North and Project North becomes crucial to ensure precise orientation and coordination. In this blog post, we will demystify the difference between True North and Project North, shedding light on their distinct roles within the software. By grasping these fundamental concepts, you will gain greater control over the geographic alignment of your building model, paving the way for accurate analysis, enhanced collaboration, and design excellence. Let’s dive in and unlock the secrets of True North and Project North in Revit.
We have prepared a video tutorial guide on how to set the geographical location in Revit and how to align your project correctly with the true north. You can view this video, further down in this blog post, or by visiting our Youtube channel HERE.
Difference Between Project North & True North
In Revit, the terms “project north” and “true north” are related to the orientation of your building model in relation to the real-world geographic north. Here’s an explanation of the difference between the two:
- Project North: Project north refers to the orientation of the building model within the Revit project. It is a user-defined reference direction that is independent of the actual geographic north. Project north is typically aligned with a specific feature of the building, such as a main entrance or a major axis, to facilitate design and coordination within the software. It helps maintain consistency and coordination between different elements of the project.
- True North: True north represents the actual geographic north direction. It refers to the real-world orientation of the building in relation to the Earth’s geographic north pole. True north is a fixed reference and does not change within a project. It is important when working with site-related information, solar studies, or when exporting the model for coordination with external tools or analysis software that requires accurate geographic orientation.

In summary, project north is a user-defined reference direction within the Revit project, while true north represents the real-world geographic north direction. Project north is adjustable and can be set according to design requirements, while true north remains constant.
In summary, project north is a user-defined reference direction within the Revit project, while true north represents the real-world geographic north direction. Project north is adjustable and can be set according to design requirements, while true north remains constant.
Why setting the correct geographical location and true north is needed in Revit?
Geographical location and True north is needed in Revit for several reasons:
- Accurate Location Representation: Allows you to accurately represent the orientation of your building model in relation to the real-world geographic north. This is particularly important when working on projects that require precise geographic alignment, such as site analysis, solar studies, or coordinating with external tools or consultants.
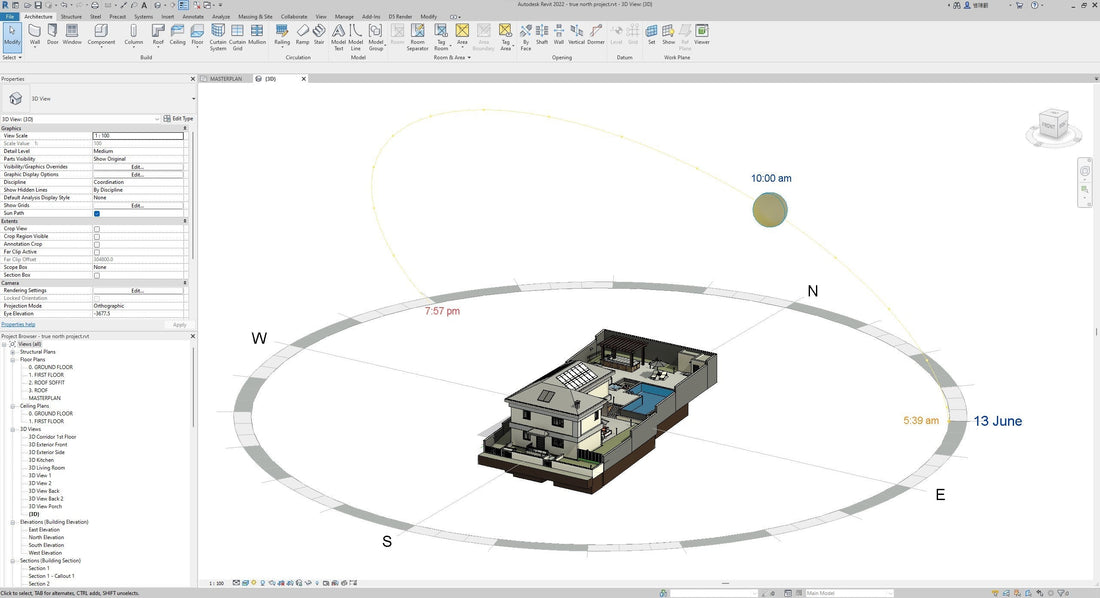
- Sun and Shadow Studies: When conducting sun and shadow studies in Revit, the position of the sun is calculated based on the actual geographic location and orientation of the building. By using true north, you can simulate and analyze the building’s exposure to sunlight throughout the day and across different seasons, helping with daylighting analysis and energy efficiency considerations.
- Site Coordination: When collaborating with other professionals, such as architects, engineers, or contractors, who may be using different software or tools, it’s crucial to have a consistent reference for the building’s orientation. By using true north, you can ensure that everyone is working with the same geographic reference, facilitating accurate coordination and communication between project stakeholders.
- Exporting and Geolocation: If you need to export your Revit model to other software applications or platforms that rely on accurate geographic information, true north becomes essential. It allows for seamless integration with tools that rely on geographic positioning, such as GIS (Geographic Information System) software, energy analysis tools, or BIM (Building Information Modeling) interoperability workflows.
By utilizing true north in Revit, you can enhance the accuracy, coordination, and analysis capabilities of your building model, enabling better decision-making and design outcomes.
How to set Geographical Location and True North in Revit.
Here is a video tutorial on how to set the geographical location and aling your project with the true north.
Setting the Geographical Location
To set the geographical location in Revit, follow these simple steps.
First, open your Revit project and navigate to the Manage tab. Locate the Location panel and click on the “Location” button. A dialog box will appear, allowing you to specify the project’s geographical coordinates.
You can either manually enter the latitude and longitude or search for the desired location using the “Acquire” button. Revit also provides the option to import location information from a DWG file or utilize a GPS device for precise positioning.
Once the location is set, Revit will automatically adjust elements like the sun’s position and project north orientation for accurate analysis and visualization. By setting the geographical location in Revit, you ensure your building model aligns with the real-world context, enabling accurate simulations, solar studies, and site analysis.

Aligning your project with the True North
To align your project correctly with the true north, you can follow these steps, as showin the video tutorial above.
- First, open any project plan view. For example, open the ground floor view.
- Turn on the Sun Solar path by clicking on the sun icon at the bottom and selecting Sun Path On.
- From the Properties Tab, under the Orientation field, open the drop down and change the view from Project North to True North.
- Visit the MANAGE tab on the program ribbon, locate the button POSITION and click on the dropdown icon.
- Select rotate true north
- A rotation function will start on the plan view. First select a rotate reference point and by either moving the rotation with the mouse, or by entering exact degree angle you can rotate your project to have a correct alignment with the true north.
- Remember, here we are rotating the model, to be oriented correctly with the true north. Not the coordinates system.
- Once you are happy with the orientation of the project, change back to Project North from the Properties tab and you are done.
Conclusion
In conclusion, understanding the concepts of True North and Project North in Revit empowers designers and architects to achieve precise orientation and coordination in their building projects. By setting the geographical location and aligning with True North, you ensure accurate representation, enhance solar studies, and facilitate collaboration with external tools. Revit’s ability to incorporate real-world geographic references strengthens the integrity and analysis capabilities of your designs. Embrace the power of True North and Project North in Revit, and unlock a new level of accuracy, efficiency, and design excellence in your projects. With these tools at your disposal, you can confidently navigate the complexities of building orientation and create exceptional architectural experiences.